Indian Snacks and Basque Gems

Despite the balmy temps we’ve had here in NJ these past few days, it’s that time of year… Diwali, the festival of lights, is right around the corner.

What exactly does this time of year mean to me? In non-Covid times, it would mean family gatherings, bright celebrations, and weeks of consecutive dinners and events with loved ones… Starting with Diwali, then Thanksgiving, Christmas… Not to mention the long days at work that Q4 brings to the Retail Wine World.

But alas, this year is a little different. My family and I are attending my mom’s Diwali celebration this year via Zoom. Our family Thanksgiving celebration is canceled. And as of now, we are looking into ideas for virtual Secret Santa and Holiday Cheer. I hope that something changes, but trying to stay vigilant for now.

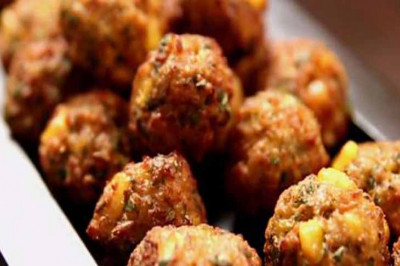
Back to Snacks and Gems! I was sifting through my freezer on Saturday when I found a marked bag of corn kernels – bagged and vacuum sealed in August, the peak of the season. I remembered how sweet this corn was that I bought at the farmer market that sunny summer day. I scoured my online files of corn recipes, searching for something that would showcase the flavor of these golden nuggets but trying to stay away from anything too “summery.” Going back to my roots, and anticipating next Saturday’s Diwali holiday, I decided on a recipe for and Indian style corn fritter (Makai Pakora.)

This is a simple, fresh, and flavorful version of the traditional pakora that I grew up eating. It’s an adaptation of David Tanis’ Spicy Corn Pakora recipe from the NY Times. The flavors will really pop if you have sweet, fresh, summer corn but it’s a pretty forgiving recipe and will be delicious with off-season as well… If you are like me and avoid deep frying at all costs, don’t fret! It was surprisingly easy and the fritters brown well in only a few minutes. I made these a few hours ahead of time, so I just popped them in a a 350 degree oven for 10 minutes before serving.

I served these Al Fresco the other night as an appetizer and decided to pair the pakora with a bottle of an extremely rare white wine from the French Basque Region of Irouleguy – Famille Berrouet Herri Mina Irouleguy Blanc 2018. (Now that’s a mouthful!)

Leave it to Jean-Claude Berrouet (former winemaker at Petrus) to make a complex yet quaffable white wine out of the sleeper varietals Gros Manseng, Petit Manseng, and Petit Corbu. The Herri Mina estate was created by Jean-Claude after many years of working at the esteemed Pomerol property and feeling the pang to return back home to Irouleguy. In Basque, “Herri” means country and “Mina” means homesick.

Enamored with the name of the estate and equally in love with the stone fruit, honeysuckle, and briny qualities of this wine, I’m hard pressed to find a better white that possesses the texture, minerality, and length that this little Basque Gem embodies. Of course, it’s available at 56 Degree Wine – click here to buy!

Makai Pakora (Spiced Corn Fritters)

Ingredients
1 cup all purpose flour
3/4 cup fine corn meal
1/4 cup chickpea flour
1 and 1/2 teaspoons kosher salt
1/2 teaspoon baking powder
1/2 teaspoon turmeric powder
2 and 1/2 cups fresh corn kernels (from approx 5-6 ears of corn -if frozen, thaw)
4 tablespoons canola or grapeseed oil
1 teaspoon cumin seeds
1/2 teaspoon mustard seeds
1/2 teaspoon fennel seeds
1 red or green chile – finely chopped
1/2 cup chopped scallions
1/2 cup chopped cilantro
1 tablespoon grated ginger
Canola oil for frying
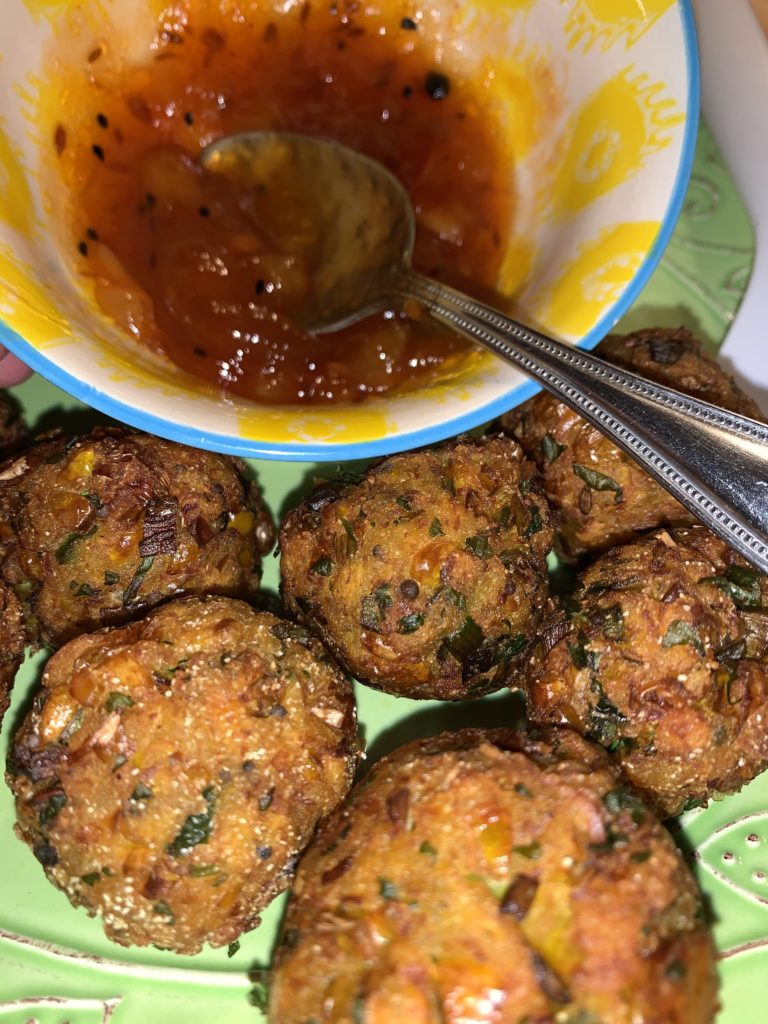
Mango Chutney (such as Major Greys)

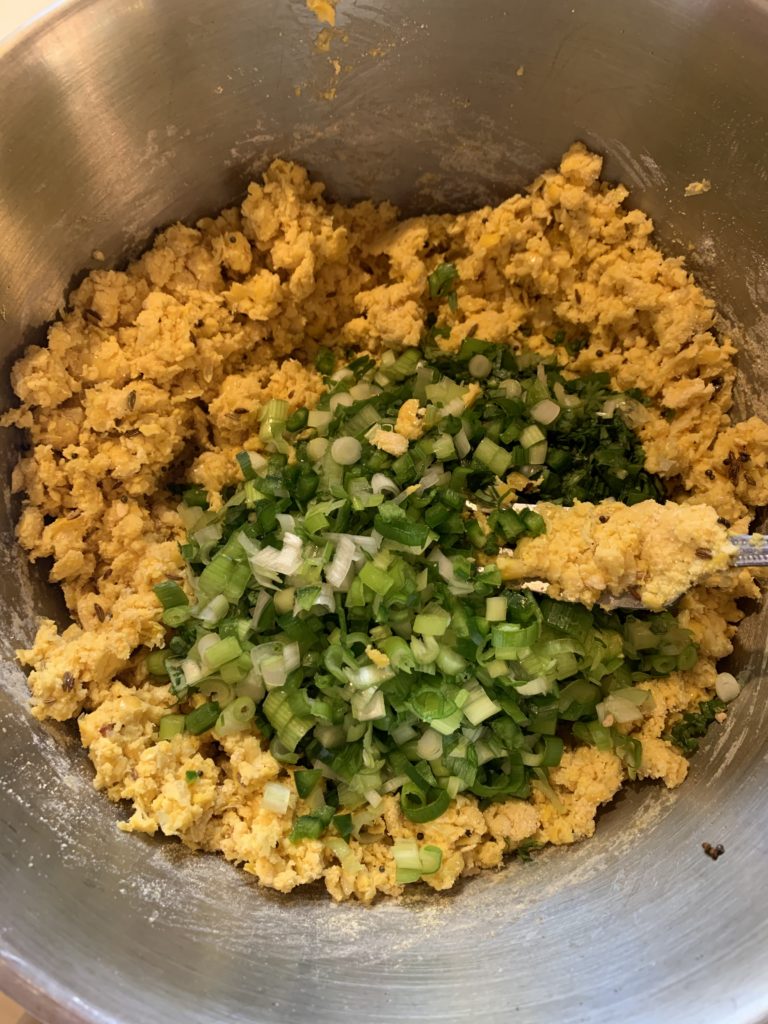
In a large bowl, combine the flours, the cornmeal, the salt, baking powder and turmeric until well combined.

Process the corn in a food processer until a coarse puree forms. Add the puree to the flour mixture and combine (mixture will be thick.)

In a small fry pan, bring the oil to medium high heat and fry the cumin, mustard, and feenel seeds until they are well browned and start to pop. Add the oil and spices to the batter and mix. Add the scallions, cilantro, and ginger to the batter and mix well. (Batter can be made a few hours before frying.)

Pour a few inches of oil into a large sauce pan and bring to medium high heat. The oil is ready when it starts to look wavy. Take a 1 inch ice cream scoop and make balls out of the batter (a few at a time at first) and carefully place the fritters in the hot oil using a 2nd spoon. The fritters will brown evenly and will take a bout 2 minutes to cook through. Using a spider, pull the fritters out and drain on paper towels. Continue with remaining batter.

Serve immediately (or reheat fritters in a 350 degree oven for about 10 minutes) and serve with your favorite Mango Chutney. I love Geeta’s brand pictured here.

Makes 18 -20 fritters

Made with LOVE

“Cooking is LOVE made visible…” – Anonymous

“Wine to me is passion. It’s family and friends. It’s warmth of heart and generosity of spirit.” – Robert Mondavi

I grew up with the understanding that food tastes better when made with love. When I was sick in bed and my taste buds were shot, my mother’s homemade soup would always make me feel better. And it was always delicious. When my daughters cook my breakfast on Mother’s day, I find myself going for seconds… sometimes thirds. Again, delicious. And of course, when my husband offers to make dinner for me on those infrequent but extremely well thought out occasions, I find myself savoring every bite as though it would be my last.

Love is one of those invisible ingredients that is necessary to every dish you create. After all, a recipe on paper (or online!) has no SOUL… It is the cook’s responsibility to bring soul to the recipe!

Inspired by LOVE and all things red, pink, and festive, we created a memorable dinner menu paired with some fabulous wines this year for Valentine’s Day. Our dear friends joined us as we paraded through courses of decadence. Here’s what we noshed and sipped on!

Charlot Tanneux Champagne Brut Cuvee Micheline 2008 – Suggested by colleagues and clients alike, I decided to bring home a bottle of this beauty for our special evening. This is a super sultry bottle of bubbles. Kudos to winemaker Vincent Charlot who clearly knows that the foundation of a stunning champagne is first and foremost, is to be a stunning WINE. This bubbly is rich, with a confusing but delicious combination of crisp and cooked apples, white fruits, flowery aromatics, and a seductive sweetness that is perfectly balanced. The perfect start to the evening!

Beet Tartare with Chevre and Maple Chili Pecans paired with A. Mandria Patrimonio Rose 2014 – We topped a composed salad of arugula, beets dressed in balsamic, and chevre  with maple-chili glazed pecans. This dish begged for a rose to be paired with it, and I couldn’t imagine a better one than this Corsican gem. Rose petals, strawberries, and citrus on the nose… Melon and stone fruits on the palate. It was a perfect match! Click here for the Beet Tartare recipe…

Egg Yolk Ravioli with Sage and Pancetta paired with Domaine Thibert Pouilly Vinzelles Les Longeayes 2012 and Domaine Bzikot Bourgogne Blanc 2013 – Velvet. That’s the word that came to mind when I tasted the perfectly runny yolk that oozed out of our ricotta and egg filled homemade raviolis into a sauce of butter, stock, sage, and pancetta. This called for a wine with some acid to pair with it. Some of my favorite producers of white Burgundy came to mind… I actually appreciated both wines with the ravioli. The Vinzelles was a better match on paper due to the richness of the wine and the buttery-“velvety” style of the sauce but the acidity of the Bzikot really cut through the decadence of the sauce and made for a perfect match. Thanks to our dinner companions for bringing the Bzikot wine – it was so nice to taste 2 very different style of white Burg with this dish! Click here for the Egg Yolk Ravioli recipe…

Braised Short Ribs with Swiss Chard and Potatoes paired with Chateau Rayas Ch du Fonsalette 2000 and Rovellotti Ghemme Chioso dei Pomi 2008 – OMG. Loved this short rib preparation. After it braised, it finished off in a 400 degree oven to almost “crisp up.” So the meat had a bite to it on the outside and was super tender once we cut into it. The velvety sauce along with the swiss chard were a great foundation for some complex and structured wines. We had two fabulous bottles. We decanted the Ghemme for almost 2 hours, and it evolved into a smooth and elegant pairing with luscious dark berry tones, aromatic violets, and structure that softened into great complexity. SO ethereal. Such a great pairing. However, I think I practically went into a trance when I took a sip of the Rayas. This 2000 vintage of juice from the Fonsalette property is labeled as Cotes du Rhone – but make no mistake… it IS a VERY serious wine! A lovely Rhone blend of red varietals, the wine is creamy and textured, game-y with lots of garrigue, some herbal tones and even a little bit of licorice. In my opinion, this wine was perfect with the short ribs and accompaniments. Click here for the short rib recipe!

Simply stated, the inspiration for the meal came form love, exuded love, and was served to those I love. Made with Love <3

Braised Beef Short Ribs with Swiss Chard and Mashed Potatoes

RECIPE: Adapted from Smitten Kitchen – Braised Beef Short Ribs with Swiss Chard and Mashed Potatoes

Serves 6 (I only served 4 but had enough leftovers for 2-3 more people)

6 large beef short ribs, about 14 to 16 ounces each (if ribs are tinier, buy by weight, not number)
2 tablespoons kosher salt
1 tablespoon freshly cracked black pepper
1/2 cup extra-virgin olive oil
1 cup diced onion
1/3 cup diced carrot
1/3 cup diced celery
4 whole sprigs thyme
2 bay leaves
2 tablespoons balsamic vinegar
1 1/2 cups port
2 1/2 cups hearty red wine
6 cups beef or veal stock
4 sprigs flat-leaf parsley
1 medium onion – cut into a nickel sized “dice”
2 bunches Swiss chard, cleaned, center ribs removed
Kosher salt and freshly ground black pepper

Season the short ribs with the salt the cracked black pepper, and preheat the oven to 425 degrees F.

Heat a large Dutch oven over high heat for 3 minutes. Pour in 2 tablespoons olive oil, and wait a minute or two, until the pan is very hot and almost smoking. Place the short ribs in the pan, and sear until they are nicely browned on all three meaty sides. Depending on the size of your pan, you might have to sear the meat in batches. Do not crowd the meat or get lazy or rushed at this step; it will take at least 15 minutes. When the ribs are nicely browned, transfer them to a plate to rest.

Turn the heat down to medium, and add the onion, carrot, celery, thyme springs, and bay leaves. Stir with a wooden spoon, scraping up all the crusty bits in the pan. Cook 6 to 8 minutes, until the vegetables just begin to caramelize. Add the balsamic vinegar, port, and red wine. Turn the heat up to high, and reduce the liquid by half.

Add the stock and bring to a boil. Arrange ribs in the pot, lying flat, bones standing up, in one layer. The stock mixture should almost cover the ribs. Tuck the parsley sprigs in and around the meat. Cover tightly with aluminum foil and a tight-fitting lid if you have one. Braise in the oven for about 3 hours.

To check the meat for doneness, remove the lid and foil, being careful of the escaping steam, and piece a short rib with a paring knife. When the meat is done, it will yield easily to a knife. Taste a piece if you are not sure. [If you would like to cook these a day ahead, this is where you can pause. The next day, you can remove the fat easily from the pot — it will have solidified at the top — bring these back to a simmer on the stove or in an oven, and continue.]

Let the ribs rest 10 minutes in their juices, and then transfer them to a baking sheet.

Turn the oven up to 400 degrees F.

Place the short ribs in the oven for 10 to 15 minutes to brown.

Strain the broth into a saucepan, pressing down on the vegetables with a ladle to extract all the juices. Skim the fat from the sauce (if you made these the day before, you will have already skimmed them) and, if the broth seems thin, reduce it over medium-high heat to thicken slightly. Taste for seasoning.

Saute the dime sized onions in a saute pan with the 2T olive oil. Saute the onions until they are lightly browned. Tear the Swiss chard into large pieces. Add 3 tablespoons olive oil to the pan, and stir in the cooked onions. Add half the Swiss chard, and cook a minute or two, stirring the greens in the oil to help them wilt. Add a splash of water and the second half of the greens. Season with a heaping 1/4 teaspoon salt and a pinch of ground black pepper. Cook for a few more minutes, stirring frequently, until the greens are tender.

Place the swiss chard on a large warm platter, and arrange the short ribs on top. Spoon lots of braising juices over the ribs. Serve the potato puree (see recipe below) on the side.

Mashed Potatoes
2 pounds potatoes, scrubbed (I used Yukon Golds)
4 tablespoons unsalted butter (1 stick, 4 ounces), melted
1 1/2 cups half-and-half , warmed
1 1/2 teaspoons table salt
Ground black pepper
Chives for garnish (optional)

1. Place potatoes in large saucepan and cover with 1 inch water. Bring to boil over high heat; reduce heat to medium-low and simmer until potatoes are tender (a paring knife can be slipped into and out of center of potatoes with very little resistance), 20 to 30 minutes. Drain.
2. Set food mill or ricer over now empty but still warm saucepan. Spear potato with dinner fork, then peel back skin with paring knife. Repeat with remaining potatoes. Working in batches, cut peeled potatoes into rough chunks and drop into hopper of food mill or ricer. Process or rice potatoes into saucepan.
3. Stir in butter with wooden spoon until incorporated; gently whisk in half-and-half, salt, and pepper to taste. Serve immediately.

Egg Yolk Ravioli with Sage and Pancetta

RECIPE for Egg Yolk Ravioli with Sage and Pancetta

INGREDIENTS

Garnish for Sauce:
1/4 lb diced pancetta
1 tablespoon olive oil
8-10 sage leaves
Filling:
1 cup whole-milk ricotta cheese
2 large egg yolks
1 teaspoon finely grated lemon peel
1/4 teaspoon salt
1/8 teaspoon (generous) ground black pepper
Pasta:
1 3/4 cups all purpose flour
1/4 teaspoon salt
3 large egg yolks
6 tablespoons (or more) water
5 teaspoons olive oil
9 large eggs
Sauce:
4 tablespoons butter
2 cups chicken stock
3 tablespoons finely grated pamesan cheese

For garnish for sauce:
To a saute pan over medium-high heat, add the olive oil and pancetta and render until crispy. Remove from the heat and place onto a paper-towel-lined plate. To the fat in the pan, add the sage leaves and fry until crispy, about 30 seconds. Season the sage leaves with salt. Finely crumble the pancetta, crumble the sage and set aside. Reserve for garnish.

For filling:
Mix all ingredients in small bowl. Refrigerate while making pasta.

For pasta:
-Whisk flour and salt in medium bowl; make shallow well in center. Add egg yolks, 6 tablespoons water, and oil to well. Using fork, whisk water, egg yolks, and oil. Gradually work in flour from around egg mixture to form crumbly mixture. Knead in bowl until dough comes together, adding more water by 1/2 teaspoonfuls if dry. Turn dough out onto lightly floured work surface and knead until smooth and elastic, about 5 minutes. Divide into 4 equal portions. Cover with plastic wrap; let rest on work surface 30 minutes.
-Line 2 baking sheets with parchment. Turn pasta machine to widest setting. Flatten 1 dough piece to rectangle (cover remaining pieces with plastic wrap). Run dough through machine 2 times. Fold uneven ends over to make straight edge. Adjust machine to next narrower setting. Run dough through machine 2 times, dusting lightly with flour if sticky. Cut dough strip in half crosswise for easier handling. Repeat running dough through machine 2 more times on each narrower setting until pasta is generous 1/16 inch thick (setting #2), dusting lightly with flour if sticky.
-Whisk 1 egg in small bowl for egg wash. Place dough strips on work surface. Cut each strip into three 4-inch squares, trimming as needed. Place 3 pasta squares on 1 prepared baking sheet. Place 1 rounded tablespoon ricotta filling in center of each of 3 squares, spreading filling to 2 1/2-inch circle. Make well in center of filling large enough to hold 1 egg yolk. Carefully break 1 egg open and separate yolk from white (reserve egg white for another use). Gently place egg yolk in well of filling. Brush edges of pasta dough with egg wash. Carefully place 1 pasta square atop egg yolk, pressing edges of pasta squares together to seal tightly, enclosing yolk and filling completely. Dust ravioli lightly with flour. Repeat procedure with remaining pasta, ricotta filling, yolks, and egg wash for a total of 8 ravioli. DO AHEAD:Ravioli can be made 4 hours ahead. Refrigerate uncovered.

For sauce:
Melt butter in a shallow pan and add stock. Bring to a very light simmer, and then add the grated parmesan cheese. Add the garnish for the sauce (pancetta and sage.) Keep at a low simmer.

Finishing the dish:
Add enough water to large skillet to measure 1 1/2inches; sprinkle with salt. Bring water to boil. Working in 2 batches, gently slide ravioli into skillet, egg yolk side up; adjust heat to keep water below rolling boil and cook just until pasta is tender, being careful not to overcook egg yolks, about 3 minutes (do not turn ravioli over). Transfer the ravioli quickly to the shallow pan with the butter sauce. With slotted spoon, transfer 2 ravioli to each of 4 plates. Spoon sauce over.

Serves 4

Beet Tartare with Chevre and Maple Chili Pecans

RECIPE for Beet Tartare with Chevre and Maple Chili glazed Pecans

Ingredients
3 large red beets (2 lbs. total)
drizzle of olive oil
3 tbsp balsamic vinegar
2 tbsp extra virgin olive oil
Salt and pepper
1/2 cup chopped walnuts or pecans
1/4 cup maple syrup
Small dash of cayenne pepper
2 1/2 cups arugula
drizzle of olive oil
salt and pepper
3 oz goat or feta cheese, crumbled (about 1 1/4 cups)

Roast Beets – Preheat oven to 400 degrees F. Scrub beets (remove the greens from beets) and place in a roasting pan. Drizzle beets with a little olive oil, and season with salt and pepper. Roast for 45 minutes to an hour, until beets are tender. Let cool. Peel beets when cool enough, and then dice into a small dice and place in a bowl with the balsamic vinegar and 2T olive oil. Season with a little more salt and pepper.

Make glazed Pecans: Toast the pecans in a dry pan over medium heat on the stove for 4-5 minutes, or until fragrant and lightly browned. Add Maple syrup and dash of cayenne and raise the heat and bring to a boil. Let cook for 2-3 minutes. Remove from heat and pour nut mixture onto a parchment lined plate. Let cool and then break apart just before serving.

Serve: Drizzle olive oil and a sprinkling of S&P over arugula in a medium bowl. Divide arugula into mounds on each of 4 salad plates. Place a ring mold on top of arugula. Divide beets dressed with balsamic into the ring molds, then top with chevre, dividing equally, and then top with nuts, dividing equally. Press down with a dry spoon but don’t compact the mixture. Lift ring mold, and Voila!

Serves 4

Rampy and Ravenous

Fresh Ramps

I know what you’re thinking…. “Really? With the title of this post?” But I couldn’t think of a more appropriate way to describe the way that I felt while writing this. Yes, Rampy. And Ravenous.

Every year at the start of spring, I look forward to finding these delicious shoots of garlic and oniony goodness in the farmers markets and local gourmet grocery store. “What IS a RAMP?” you ask? Well, I wrote about it 4 years ago in this post too, so take a look and get another fantastic recipe to use them in!

I found a few fresh bunches at the market on Saturday and was inspired to use them in everything I cooked. I added some ramps into some marinades that we used for grilling, chopped some up and sprinkled them over eggs, and even seasoned some simply with salt, pepper, and olive oil and grilled them to perfection. The grilled ramps are definitely going to be a staple side dish as long as they are available!

But the recipe that got the highest accolades of the weekend was a simple breakfast biscuit. This was made for a book club brunch and was received with rave reviews. So savory, just spread a little fresh butter on top for an indulgent treat!

Two-bite Ramp Buttermilk Biscuits

1/2 bunch of ramps, cleaned and trimmed
3/4 cup buttermilk, plus 2 tablespoons
1 1/2 cups all purpose flour
1 teaspoon salt
2 teaspoons baking powder
20 grinds of fresh black peppercorns
6 tablespoons unsalted butter, chilled and cut into small pieces

Preheat the oven to 425 degrees F.

Chop the bulbs and stalks of the ramps finely. Chop the leaves as fine as possible without bruising them. Combine the stalks, bulbs, and leaves of the ramps and the 3/4 cup buttermilk in a small bowl. Set aside.

Combine the flour, salt, baking powder, and fresh ground pepper in a food processor. Turn the food processor on for about 30 seconds, until all the dry ingredients are well combined. Add the chilled butter to the flour mixture, and pulse until a fine meal forms, about 15 pulses.

Transfer the flour mixture to a large bowl. Add the buttermilk-ramp mixture and stir just until a dough forms. Do not over-mix. Turn out the dough to a floured work area, and press the dough into a 7-inch diameter round, about 1/2 inch thick. Use a 1 inch diameter biscuit cutter dipped in flour to cut out rounds. Gather the scraps of the dough, reform, and cut more out this same way. Transfer the biscuit rounds to a baking sheet lined with parchment paper. The recipe should yield about 20-22 small biscuits. Alternatively, you may make larger ones by using a 2-inch biscuit cutter. See below for change in baking time.

Bake the biscuits for 15 minutes until golden brown, and cool on a rack. Serve warm or at room temperature. If you use the 2-inch cutter, increase the bake time to 18-20 minutes. Yields 20-22 small biscuits or 10-12 larger biscuits.

Bo Ssam and Boxler

Bo Ssam at Momofuku Ssam Bar

Pork Belly Buns at Momofuku Ssam Bar

It’s been almost two years since the first time I took part in the ethereal “Bo Ssam” experience. I was lucky enough to be invited to a table at Momofuku Ssam Bar one May evening, being told nothing else but “We are doing Bo Ssam.” I did my research, and learned that Bo Ssam is in fact an EXPERIENCE, not only a dinner. We started with some amazing appetizers, the pork belly buns being amongst the  most memorable. Oysters were brought out to the table,  in addition to plates of butter lettuce leaves, kimchi, a few different sauces, lots of white rice, and of course – the perfectly caramelized, falling off the bone, mouthwatering roasted pork shoulder. And tongs. We made little lettuce wraps, rice bowls, you name it. We ate for what should have been hours, but felt like minutes. David Chang is an absolute genius – he somehow elevates pulled pork to a whole new level!

One of our dining companions brought this to dinner - WOW.

We enjoyed every aspect of the dinner that evening, including some of the amazing wines that we paired with the meal… Magnum of Chartogne Taillet Champagne, Magnum of 2006 Donnhoff Niederhauser Hermannshohle Riesling (Wow!),  2006 Jasmin Cote Rotie, and the showstopping 1976 Cune Imperial Gran Reserva.

Homemade Roasted Pork Shoulder with Caramel Crust for Bo Ssam

Homemade Ramen with eggplant chili mazeman and pork belly

Well, that dinner set the stage for several future experiments in my own kitchen. While extremely time consuming, (warning – do not attempt to make these recipes on a weeknight unless you have the day off!) the results are well worth the effort. I’ve used the meat from the bo ssam for the filling in the pork buns, but nothing is more decadent and satisfying as the pork belly. David Chang’s Bo Ssam recipe is almost fool proof – roasting the bone in pork shoulder low and slow for several hours and then encasing the super tender meat with a crunchy caramel-ly brown sugar crust at the end. These flavors even inspired me to make several attempts at homemade ramen. I’ve experimented with a few recipes, but really appreciated the depth of flavors of the one that I post below.

The richness of these dishes call for something that screams acidity and offers some reprieve to the heat that the accompaniments like the kimchi and sauces bring to the table. I found the wines from Albert Boxler to be ideal for these pairings. Everything from the Sylvaner to the Pinot Blanc… the Riesling to the Grand Cru cuvee have paired sublimely with the recipes below! Forget “Pigs and Pinot”… it’s time for Bo Ssam and Boxler!

David Chang’s Bo Ssam Recipe – I followed it to a tee. Give yourself a day to make this and enjoy leftovers for a week!

Momofuku’s Pork Belly Buns Recipe – I have also used leftover pork shoulder from my Bo Ssam to fill leftover buns – really great alternative but the pork belly is super decadent!

Ramen with Pork and Chili Eggplant Mazeman – I don’t agree with the amount of oil used in this. It’s already so rich with the pork belly and I actually only used a third of the amount of oil in each step that calls for it – My first attempt was tasty but very oily. I thought cutting back the oil made a huge difference.

Exotic Comforts ~ Sweet Pairings

This is one of my favorite “special occasion” recipes that reminds me of the flavors that I grew up with. I used to take for granted the exotic aromas, colors, and tastes of the foods from my childhood, from my parents’ birth country. But now I embrace them and search for the perfect pairings that will only enhance these fabulous flavors!

My mother taught me at a young age that every aspect of Indian cooking has a practical “reason” or benefit. For example, Turmeric is used in almost all Indian recipes, and has an extensive medicinal repertoire! Everything from its antioxidant qualities to its anti-inflammatory uses, has awarded this amazing spice its invaluable reputation. Additionally, the use of ginger in almost all of my childhood meals was used to aid in curing sore throats, colds, and even used in preventative measures. Roasted Fennel seeds are a common “after dinner treat” that aid in digestion. While many of these ingredients add flavor and depth, Indian food is also known for its heat – both warm and spicy!

Riesling is known to be an optimal pairing for spicy foods. I find that the acidity in the 2012 Donnhoff Estate Riesling offers a perfect balance to the wine, and the sweetness of it pairs perfectly with this dish. Enjoy!

Chicken Tikka Masala

Serves 4 dinner portions

For the marinade:
1 cup whole milk yogurt
6 garlic cloves, minced
2 tablespoons grated fresh ginger root
2 teaspoons ground turmeric *
1 tablespoon ground cumin
1 tablespoon ground coriander
1 tablespoon garam masala *
1 tablespoon kosher salt
2 lbs boneless skinless chicken thighs (make small slits in pieces of chicken before marinating)

* Can be found at specialty markets and grocery stores, or at Specialty Asian/Indian grocers – or try Kalustyans

For the sauce:
2 tablespoons plus 1 teaspoon canola oil
¼ cup blanched whole almonds
1 large onion, finely chopped
4 large garlic cloves, minced
2 teaspoons grated fresh ginger root
2 teaspoons ground cumin
2 teaspoons ground coriander
¼ teaspoon ground cinnamon
2 teaspoons fresh chopped serrano chili or 1 teaspoon ground cayenne **
1 teaspoon garam masala
1 28 oz can Jersey Fresh pureed tomatoes OR 2 to 3 (14 to 15 oz) cans whole tomatoes, chopped, juices reserved
Pinch of sugar
½ cup heavy cream
½ cup chopped fresh cilantro leaves (optional)

** This dish is moderately spicy. The heat level can be adjusted by adding more or less chili or cayenne according to your preference.

Marinate the chicken: Combine the first 8 ingredients together in a large bowl. Add chicken and combine well. Marinate overnight in the refrigerator.

The next day, grill the chicken (wiping off any excess marinade) on a hot grill or grill pan, or you can broil it – for ten to twelve minutes, or until charred in certain areas. CHICKEN WILL NOT BE COOKED THROUGH AT THIS POINT. Remove from grill/ grill pan/ oven and cut into 1 inch pieces. Set aside.

Heat 1 teaspoon of oil in a small pan. Add blanched almonds and sauté at moderate heat until slightly browned stirring constantly, about 5 minutes. Let the almonds cool completely, and then pulse them in a food processor until finely ground. Set aside.

Heat the remaining 2 tablespoons of oil in a large enameled cast iron casserole (I used my Le Crueset.) Saute the onions, garlic, and ginger over moderate heat, about 8 minutes. Add the next 5 ingredients and sauté for about 1 minute. Add the tomatoes (if not using Jersey Fresh, add only one and a half cans of the reserved juices,) sugar, and season with salt and pepper. Cover partially and simmer for about 20 minutes, on medium low, stirring occasionally. Sauce should be slightly thickened at this point.

Add the cream and the almonds, stir and cook for another 5 minutes. Add in the chicken, simmer gently for 10 minutes, stirring frequently. Add the cilantro leaves at this point if you wish, take off the heat, and serve with basmati rice and/or warm naan.

Sumptuous Summer

The farmers markets are full of colorful, bright, and fresh produce right now…. so I am taking advantage of summer’s bounty! When using farm fresh produce, there is no need for heavy seasonings or altercations of flavor. What you see is what you get, and it’s nature’s best representation of the season. Here are some of my favorite summer ingredients in both sweet and savory creations…

Strawberries
Although I first used ripe, sweet strawberries in this recipe in the late spring, I’ve been making this throughout the summer as well with equal success. The sweet fruit shines and is perfectly accompanied by the heat of black peppercorns, and the acidity of the vinegar. Perfect topping for toast or for goat cheese bruschetta! – Credit to old school Gourmet Magazine and Sejal for introducing me to this recipe! Strawberry Preserves with Black Pepper and Balsamic Vinegar: In a small heavy saucepan, combine 2 cups strawberries (trimmed and quartered,) 1 1/2 cups sugar, 3 tablespoon balsamic vinegar, 3 tablespoons water, and 1 teaspoon cracked fresh black pepper. Simmer the mixture, skimming the foam occasionally, for 15 minutes or until thickened. Let cool completely – this will keep, covered, for up to a month.

Sour Cherries
While I love snacking on the sweeter bing or rainier cherries throughout the summer season, these tart little gems only have a 2 to 3 week season here in NY/NJ (early July) and are the perfect ingredient for pies, tarts, and preserves! I experimented with a sour cherry salsa which unfortunately accentuated the tart, astringent flavor. More successful was the sour cherry preserves that I made – a great topping for ice cream, or wonderful even in savory appetizers (placed on top of a toast with melted robiola cheese.) One of my favorite desserts is Sour Cherry Turnovers (click here for the recipe.)

Blueberries
We picked blueberries at a local farm the other day – there really are only a few things that can compare to beautiful, ripe, NJ blueberries in July! So, naturally, we brought our stash home, proceeded to snack on them throughout the rest of the day, and stuck a few cups-full in the freezer. I made this blueberry smoothie the next morning – so delicious and the perfect anti-oxidant rich breakfast for my family! Creamy Blueberry Smoothies: Combine in a blender (I use my vitamix for a very smooth texture) – 1 cup frozen blueberries, 1/4 cup skim milk, 3/4 cup plain or vanilla lowfat yogurt, 1 teaspoon honey. Blend until completely smooth, and enjoy immediately! (Throw in some flax or chia seeds for an extra healthy boost!)

Shishito Peppers
I don’t often find these in the markets in NJ, but every now and again I will stumble upon a gorgeous batch of shishito peppers at one of the Manhattan open markets… No matter what my menu is for that evening, I somehow find a way to incorporate these delightful, slightly spicy little peppers! The entire pepper is usually eaten, seeds and all – and the way that I prepare them is just a little olive oil, sea salt, and a hot skillet – blistering them slightly all over. I am getting hungry just typing this! This is a very general recipe – the qty of the ingredients depends on the size of the pan you are using… Blistered Shishito Peppers: Heat a skillet over medium high heat, and add a good amount of extra virgin olive oil to coat the pan. You want the oil to be pretty hot… Add the peppers, and make sure that they are coated with the oil. Then, leave the peppers alone for a minute or two per side. They will blister and after about 4 to 5 minutes total cooking time, they are done. Transfer them to a serving plate and immediately add some flaky sea salt, keep a small empty bowl nearby so that you can discard the stems as you eat… Enjoy!

Sweet Corn
Every summer around this time, I think of the sweet corn that one of the farmers at the Ithaca Farmers Market sold to us a few years ago… He took his pocket knife, cut off a little section of yellow and white kernels from the cob, and offered it to us to taste. It was by far the sweetest, and most savory corn I ever had – RAW too, to top that! We as a group proceeded to buy what seemed to be a truckload of corn from him, and the recipes that week were endless. Click here for a recipe for Summer Corn Pesto that is a great accompaniment to any pasta of your choice. Click here for a fabulous sweet corn soup recipe… I topped it with the meat of grilled langoustines, but you could just roast off some corn kernels to top, or any other accompanying vegetable on top would be great too…

And the list goes on… mangoes, and pineapples, eggplant,  summer squash…… I’ll leave those to my next post – I’ve got to choose amongst a dozen or so tomato recipes so stay tuned! 🙂

Sweet Corn Soup

Make this soup with the season’s sweetest crop of corn!

Sweet Corn Soup

2 tablespoons butter
1 tablespoon olive oil
1 large onion, chopped
1 medium fennel bulb, trimmed, cored, and chopped
4 cloves of garlic, chopped
10 to 12 ears of fresh sweet corn, shucked, and kernels cut off of the cobs – this should yield 7 to 8 cups of corn (I used yellow and white mixed – but use whatever you want as long as it’s fresh!)
4 1/2 cups water
salt and pepper to taste
2 tablespoons chives, chopped

Melt butter and olive oil in a large soup pot over medium heat. Add onions and fennel and saute until softened, about 7 minutes. Add garlic and saute about a minute until fragrant. Add the corn and mix together with all of the other ingredients, making sure corn is well coated with the butter, oil, and bits of garlic, about 3 minutes. Add water and increase heat to bring the mixture to a boil. Simmer on low, partially covered, for about 15 minutes.

Transfer the soup to a blender (I used my vitamix for a super smooth and creamy result – you may have to do this in portions) and blend until completely smooth. Transfer the blended soup back to the soup pot, add salt and some generous pepper grinds to taste, and keep warm. You may make the soup up to this step, transfer to tight sealed containers and refrigerate for up to one day.

When ready to serve, rewarm soup over medium heat, stirring. Ladle into soup bowls, sprinkle with chives, and serve. We had fresh langoustines from Metropolitan Seafood the day we served this, so we grilled them off and topped the soup with the langoustine meat. I roasted fennel and topped one of our guest’s bowls with that instead instead to keep it vegetarian. Makes 6 to 8 servings.